
Beyond the Prompt: Designing AI Experiences with Gradio
In the age of AI, models are powerful. But without a UI, they’re locked in a black box. Discover how Gradio lets your models speak, draw, and come alive—with just a few lines of Python.
Introduction
During his keynote at Y Combinator's AI Startup School in June 2025, Andrej Karpathy emphasized a powerful yet often overlooked truth: every partially autonomous AI application needs a thoughtfully designed, application-specific UI. Why? Because while large language models (LLMs) can generate content in seconds, the real bottleneck lies in human validation. The cycle of generating, reviewing, and prompting again is only as fast as the human in the loop.
Karpathy illustrated this with a compelling example. Suppose you prompt an LLM to draft a speech for Independence Day. The model may output several paragraphs in moments, but it takes far longer for a person to read, evaluate, and refine the response. This generation-validation loop is where time and productivity often get lost. Without a tailored UI to guide interaction, visualize outputs, and offer streamlined controls, even the most powerful AI struggles to deliver value efficiently.
Motivated by this insight, I set out to find tools that could help bridge this gap—tools that would enable me to build intuitive UIs for AI applications, accelerate the validation cycle, and provide controls for adjusting the model's autonomy in real-time.
That's when I discovered Gradio—an open-source Python library that makes it remarkably easy to create user interfaces for machine learning models, LLMs, and even plain Python functions. With just a few lines of code, Gradio enables you to quickly spin up interactive demos, test different prompts, visualize results, and wrap AI capabilities in a clean, usable interface. It empowers developers—even those without a background in frontend development—to build engaging, insightful AI experiences in minutes.
What This Blog Will Cover
In the rest of this blog post, I'll walk through some of the key features that make Gradio such a powerful tool for designing AI experiences. To keep things simple and approachable, I'll build a basic application that evolves with each feature, starting with a dummy chatbot and eventually integrating LLMs, image generation, and interactive controls. Along the way, you'll see how Gradio enables:
- Rapid Prototyping: Create interfaces in just a few lines of code
- Conversational UIs: Build chatbots and text-based applications effortlessly
- Multimodal Interfaces: Handle text, images, and other data types seamlessly
- Interactive Controls: Adjust parameters on the fly to explore model behavior
- Shareable Demos: Instantly launch and share your app with others
For those who want to dive right into the code, you can find the complete working example here.
Let’s start with one of the most compelling use cases: rapid prototyping.
Rapid Prototyping: From Idea to Interface in Seconds
One of Gradio's standout features is its ability to enable rapid prototyping with ease. With just a few lines of Python, you can go from a basic idea to a fully functional, interactive user interface—no need for complex frontend development or deployment pipelines.
To demonstrate this, let’s start with something simple: a dummy chatbot. This bot doesn’t use an LLM—it just responds to a few keywords—but that's precisely the point. The goal here is to showcase how quickly and easily you can spin up a working interface using Gradio. Believe it or not, the entire chat UI below is created with a single line of code.
1import gradio as gr
2
3def chat(message, history):
4    # Convert input to lowercase for case-insensitive matching
5    user_input_lower = message.lower()
6
7    if "hello" in user_input_lower or "hi" in user_input_lower:
8        return "Hi there! What's on your mind?"
9    elif "how are you" in user_input_lower:
10        return "I'm just a program, but I'm functioning well!"
11    elif "name" in user_input_lower:
12        return "Dummy Chatbot: I am the Dummy Chatbot."
13    elif "bye" in user_input_lower or "exit" in user_input_lower:
14        return "Goodbye! Have a great day."
15    else:
16        return "I'm not sure how to respond to that. Can you rephrase?"
17
18if __name__ == "__main__":
19    gr.ChatInterface(chat, type="messages").launch()
The gr.ChatInterface() Component instantly wraps your function in a clean, interactive chat UI. This makes it incredibly easy to test ideas, validate interaction patterns, or share demos before even considering integrating a full-scale LLM. This simple example yielded a functioning chat interface in minutes, as seen below.

Focus on Machine Learning: Bringing Your Chatbot to Life
While Gradio can be used to wrap any Python function, its true strength shines when working with machine learning models—especially in the realm of generative AI. In the following example, I take the dummy chatbot from earlier and supercharge it by connecting it to OpenAI's gpt-4o-mini model. With just a single additional line of configuration, the chatbot springs to life with intelligent, contextual responses.
One of Gradio’s most powerful features here is context preservation. Notice how the chat() function receives not just the current message, but also the full history of prior exchanges. This ongoing message history is passed directly into the OpenAI API, giving the model the context it needs to generate meaningful replies in a multi-turn conversation.
Here's Gradio's complete code:
1import gradio as gr
2import os
3from openai import OpenAI
4from dotenv import load_dotenv
5
6# Load environment variables from .env file
7load_dotenv()
8
9# Initialize OpenAI client
10client = OpenAI(
11    api_key=os.getenv("OPENAI_API_KEY")  # Make sure to set your OpenAI API key as environment variable
12)
13
14def chat(message, history):
15    """
16    Use OpenAI to generate intelligent responses instead of dummy responses
17    """
18    try:
19        response = client.chat.completions.create(
20            model="gpt-4o-mini",  # You can change this to other models like gpt-4
21            messages=[{"role": "system", "content": "You are a helpful and friendly AI assistant. Keep your responses concise and engaging."}]
22                     + history
23                     + [{"role": "user", "content": message}],
24            max_tokens=150,
25            temperature=0.7
26        )
27
28        content = response.choices[0].message.content
29        return content.strip() if content else "I'm sorry, I couldn't generate a response."
30
31    except Exception as e:
32        return f"I'm having trouble connecting to my brain right now. Error: {str(e)}"
33
34if __name__ == "__main__":
35    gr.ChatInterface(chat, type="messages").launch()
36
And just like that, you've created a functional, intelligent chatbot interface—without needing to write a single line of HTML or JavaScript. Here's what the interface looks like when launched:

This example demonstrates how easily you can integrate a powerful language model into your application using Gradio. Whether you're building a customer support bot, an AI tutor, or a creative writing assistant, Gradio takes care of the UI so you can focus on what matters most: the model.
Ease of Use: Build Polished Interfaces Without Writing Frontend Code
Another standout feature of Gradio is how it completely abstracts away the complexities of web development. You do not need to know JavaScript, HTML, or CSS to create a professional-looking interface. Whether you want to add UI elements like hints, examples, labels—or even enforce a dark mode theme—it's all just a function argument away.
In this next enhancement of the chatbot, I've added:
- A custom title and description
- A placeholder prompt in the input box
- A set of clickable example questions to guide users
- A modern dark mode using the
theme="ocean"setting
And all of that was accomplished without writing a single line of frontend code. Here’s the modification:
1gr.ChatInterface(
2    chat,
3    type="messages",
4    theme="ocean",  # Enables a beautiful dark mode UI
5    textbox=gr.Textbox(
6        placeholder="Chat with me! I'm powered by OpenAI and can help with various topics.",
7        container=False,
8        scale=7
9    ),
10    description="Ask me anything! I'm an AI assistant powered by OpenAI.",
11    examples=[
12        "What's the weather like today?",
13        "Can you help me with Python programming?",
14        "Tell me a joke",
15        "What are the benefits of machine learning?"
16    ],
17    title="🎉 Smart AI Chatbot!"
18).launch()
19
Here's what it looks like when you run it:

This level of polish—titles, tooltips, themes, and guided interaction—would usually require hours to implement manually in a traditional frontend stack. However, with Gradio, it's just a matter of configuration.
This makes Gradio the perfect companion for data scientists, ML engineers, and AI enthusiasts who want to share their models without worrying about UI frameworks or frontend deployment.
Customizable UIs: Assemble Rich Interfaces with Blocks and Components
While Gradio excels at simplicity, it doesn't stop there. It also gives you powerful tools to build fully customized user interfaces using a rich library of pre-built components and layout primitives. You don't need to worry about frontend complexities, such as event handling, DOM manipulation, or UI state syncing—Gradio abstracts all of that away.
At the heart of this customization capability is Gradio's Blocks API. Think of Blocks as a layout engine that lets you compose reusable components—textboxes, buttons, images, plots, etc.—into cohesive, multi-section applications.
Here’s a quick overview of some Gradio components used in the following example:
- Textbox: Accepts or displays text input
- Button: Triggers events, like clicks
- Image: Accepts uploaded images or displays results
- Number: Takes numeric input or displays numeric output
- Plot: Renders charts and graphs
Gradio also provides layout containers to organize your app visually:
- Tab: Segment content across different functional areas
- Row and Column: Organize components side by side or vertically
Example: Multi-Tabbed Interactive App
In the example below, I've used Gradio to create a learning project with four tabs:
- Text Processing – Greet the user
- Mathematics – Calculate the square of a number
- Image Processing – Convert an image to grayscale
- Data Visualization – Generate and display a noisy sine wave plot
Here’s the code:
1with gr.Blocks(title="FirstGradio - Learning Examples") as demo:
2    gr.Markdown("# 🎉 Welcome to FirstGradio!")
3    gr.Markdown("This is a learning project to explore Gradio capabilities.")
4
5    with gr.Tab("Text Processing"):
6        gr.Markdown("## Text Processing Example")
7        with gr.Row():
8            with gr.Column():
9                name_input = gr.Textbox(label="Enter your name", placeholder="Type your name here...")
10                greet_button = gr.Button("Greet Me!")
11            with gr.Column():
12                greet_output = gr.Textbox(label="Greeting", interactive=False)
13
14        greet_button.click(greet, inputs=name_input, outputs=greet_output)
15
16    with gr.Tab("Mathematics"):
17        gr.Markdown("## Mathematical Operations")
18        with gr.Row():
19            with gr.Column():
20                number_input = gr.Number(label="Enter a number", value=5)
21                square_button = gr.Button("Calculate Square")
22            with gr.Column():
23                square_output = gr.Number(label="Result", interactive=False)
24
25        square_button.click(calculate_square, inputs=number_input, outputs=square_output)
26
27    with gr.Tab("Image Processing"):
28        gr.Markdown("## Image Processing Example")
29        with gr.Row():
30            with gr.Column():
31                image_input = gr.Image(label="Upload an image")
32                process_button = gr.Button("Convert to Grayscale")
33            with gr.Column():
34                image_output = gr.Image(label="Processed Image")
35
36        process_button.click(process_image, inputs=image_input, outputs=image_output)
37
38    with gr.Tab("Data Visualization"):
39        gr.Markdown("## Data Visualization Example")
40        with gr.Row():
41            plot_button = gr.Button("Generate Random Data")
42            plot_output = gr.Plot(label="Random Sine Wave with Noise")
43
44        plot_button.click(generate_random_data, outputs=plot_output)
45
46if __name__ == "__main__":
47    demo.launch(share=False, debug=True)
48
And here'sHere's how it looks in action:

This example demonstrates the power and accessibility of Gradio when building interactive ML dashboards, data exploration tools, or educational apps. You’re not just building a user interface, you're creating a fully interactive frontend without touching JavaScript.
Image Generation & Multimodal Interfaces: Going Beyond Text
Gradio isn't just for language models—it shines when you want to combine multiple input/output types in a single, seamless UI. Whether you’re building an image generator, a multimodal chatbot, or a document analyzer, Gradio lets you work with text, images, audio, video, sliders, dropdowns, and more—all with very little code.
In this example, let's create a simple AI-powered image generator that uses a prompt (text input) to generate an image using a pre-trained model. We use OpenAI's DALL-E for image generation. However, you can plug into any API (like Stability AI models).
Example: Prompt-Based Image Generator
1import gradio as gr
2import os
3from openai import OpenAI
4from dotenv import load_dotenv
5from io import BytesIO
6from PIL import Image
7import base64
8
9load_dotenv()
10
11client = OpenAI(
12 api_key=os.getenv("OPENAI_API_KEY")
13)
14
15
16def generate_image(prompt):
17 response = client.images.generate(
18 model="dall-e-3",
19 prompt=prompt,
20 n=1,
21 response_format="b64_json",
22 size="1024x1024"
23 )
24
25 if not response.data or not response.data[0].b64_json:
26 raise ValueError("No image data received from API")
27
28 img_data = base64.b64decode(response.data[0].b64_json)
29 img = Image.open(BytesIO(img_data))
30 return img
31
32with gr.Blocks(title="AI Image Generator") as demo:
33 gr.Markdown("# 🎨 Prompt to Image Generator")
34 gr.Markdown("Type in a creative prompt, and I'll visualize it for you!")
35
36 with gr.Row():
37 with gr.Column():
38 prompt_input = gr.Textbox(label="Enter your prompt", placeholder="A sunset over the mountains...")
39 generate_button = gr.Button("Generate Image")
40 with gr.Column():
41 image_output = gr.Image(label="Generated Image")
42
43 generate_button.click(fn=generate_image, inputs=prompt_input, outputs=image_output)
44
45if __name__ == "__main__":
46 demo.launch()
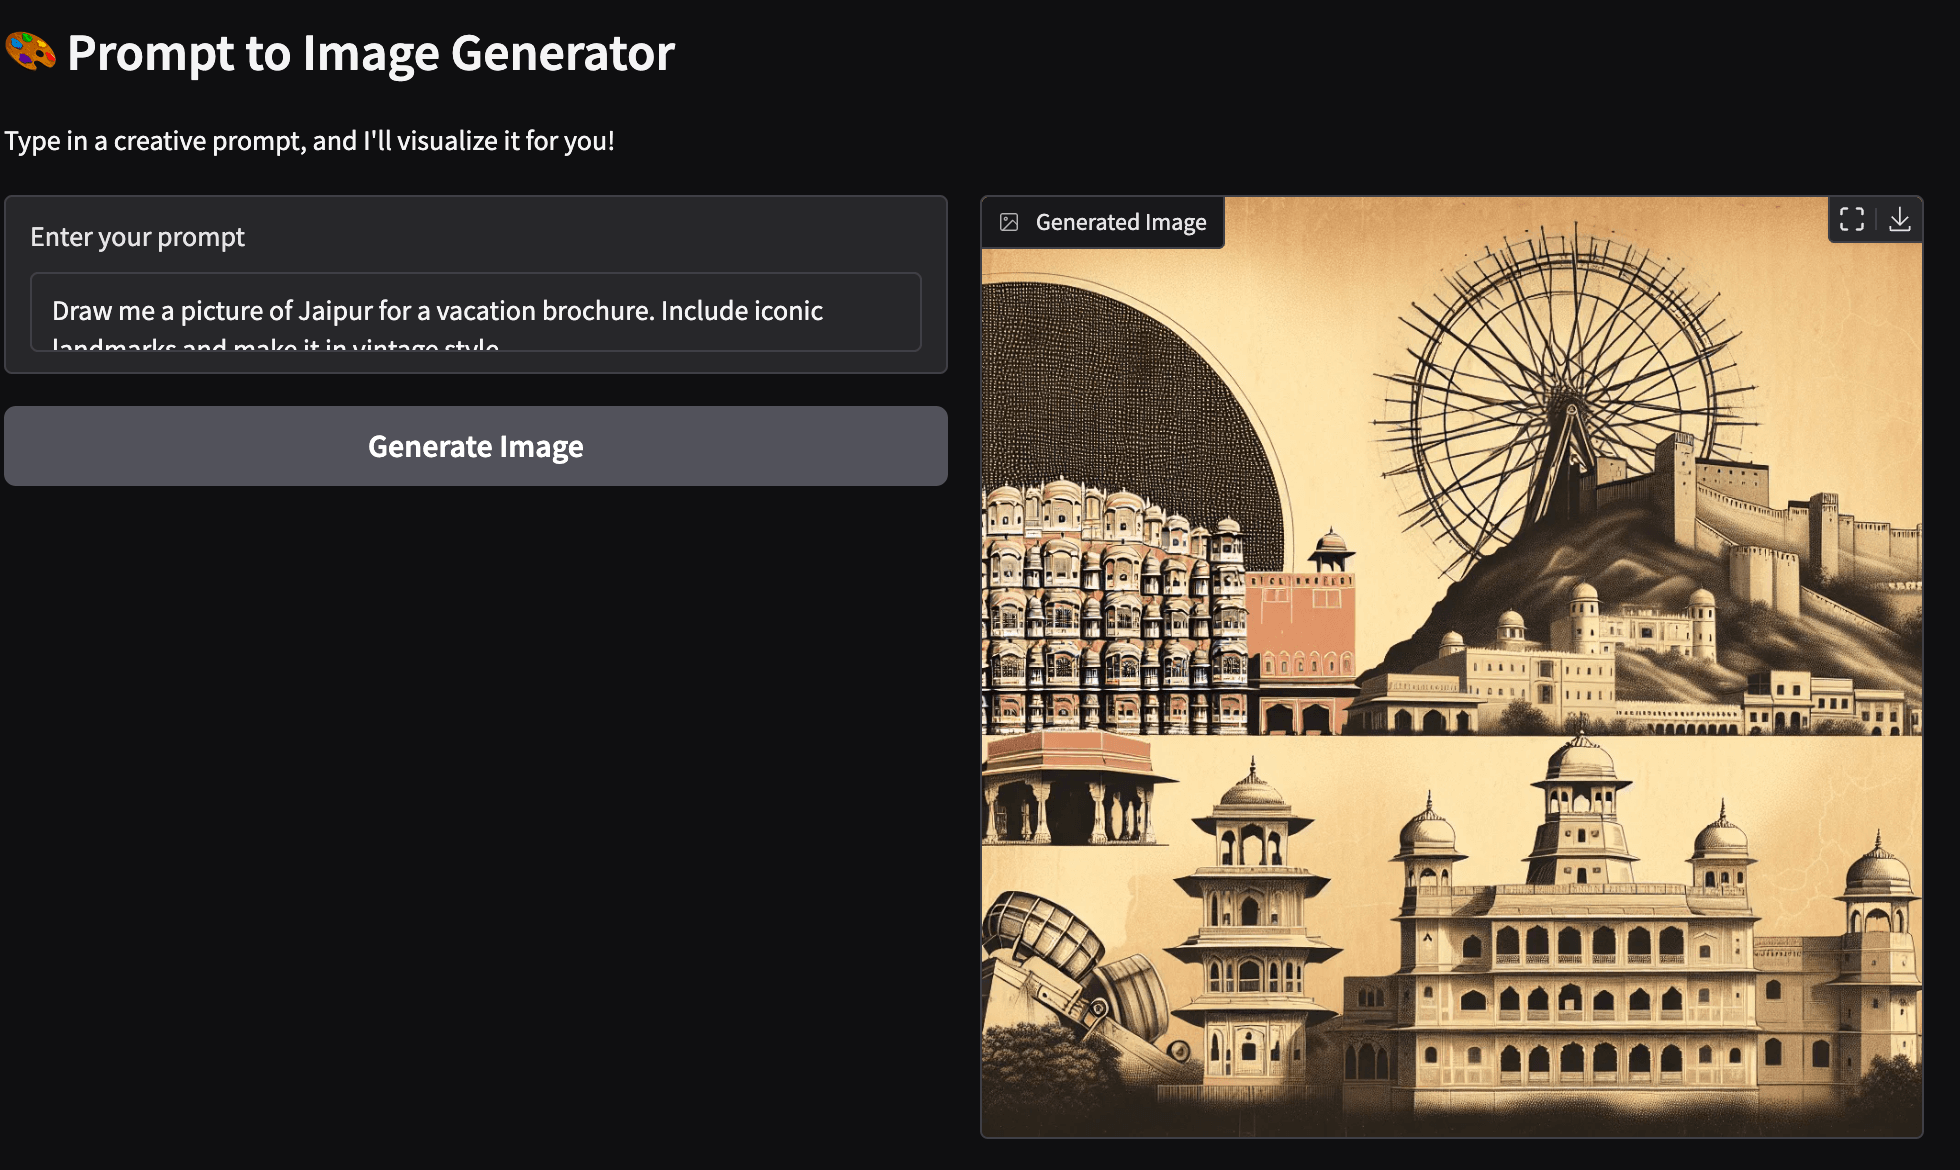
47Here is an image of my hometown, Jaipur, generated by this simple application. You can see some of the iconic landmarks, such as Hawa Mahal (the Wind Palace), the quintessential bazaars of Jaipur, and the sun setting behind the Aravali mountain range.

Why This Matters
This simple example can be easily extended to create interesting applications. Want to allow users to upload an image, enter a prompt, and see both a modified image and text-based summary? Gradio makes this multimodal interactivity trivial to implement. One of the examples in the git repo allows you to upload an image and convert it to grayscale.
By mixing input/output components like Textbox, Image, Audio, and Dropdown you can build:
- Prompt-to-image tools
- Image captioning apps
- Visual question answering interfaces
- Audio transcription or enhancement pipelines
- And much more—all with minimal frontend effort
Conclusion: From Idea to Interaction
In the age of AI, building a powerful model is only half the story. The real magic happens when that model becomes interactive—when users can engage with it, test it, learn from it, and even be delighted by it. That’s exactly where Gradio shines.
From rapid prototyping to fully customized applications, Gradio provides developers and researchers with the tools to move quickly, build intelligently, and share their AI work with the world. No frontend expertise? No problem. With just Python, you can build interfaces that are clear, polished, and production-ready.
So, whether you're working on chatbots, image generators, data dashboards, or something the world hasn’t seen yet, Gradio helps you get it in front of real users, faster than ever before.
Try It Yourself!
Curious to see it in action? You can find the complete code used in this blog post on my GitHub repo:
You may also want to visit Gradio's official docs to dive deeper.
Or, just pip install gradio and start building your first app in minutes
Got feedback, questions, or cool Gradio apps of your own? Drop me a comment or share your experiments—I’d love to see what you're creating!
Comments (0)
Leave a Comment
Loading comments...
Post Details
Author
Anupam Chandra (AC)
Tech strategist, AI explorer, and digital transformation architect. Driven by curiosity, powered by learning, and lit up by the beauty of simple things done exceptionally well.
Published
July 15, 2025
Categories
Reading Time
11 min read